LMS 2-6-4Ts
Every layout based on the London Midland Region in steam days needs a selection of 2-6-4Ts. This page will detail the ones I intend to have on Pendle. There are three main variants, the original Fowler locos, the later Stanier locomotives and the Fairburn design.
The Fairburn 2-6-4T
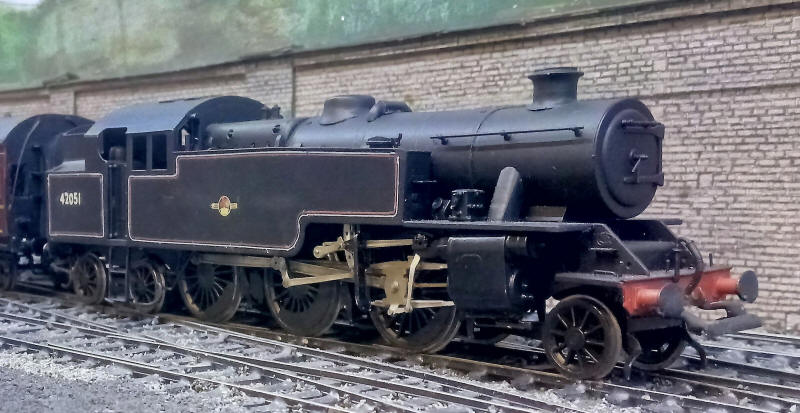
I was fortunate in obtaining Alan Gibson's Fairburn 2-6-4T - it has travelled to Australia and back as I sold it when I developed nerve damaged and had to give up intricate modelling work. When I recovered most of my detexterity I regretted selling it.
Fortunately, I was able to persuade its new owner to sell it back to me and luckily the model survived the journey unscathed.To operate it on my layout I needed to modify the pony and bogie pivots slightly and I also fitted coupling buffing plates at either end so that it can couple to and propel rolling stock without buffer locking. The locomotive has been lined and numbered as 42051, a long term resident at Hellifield shed
The Stanier 2-6-4T
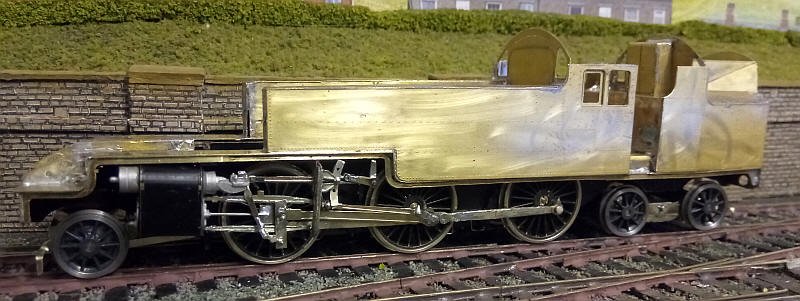
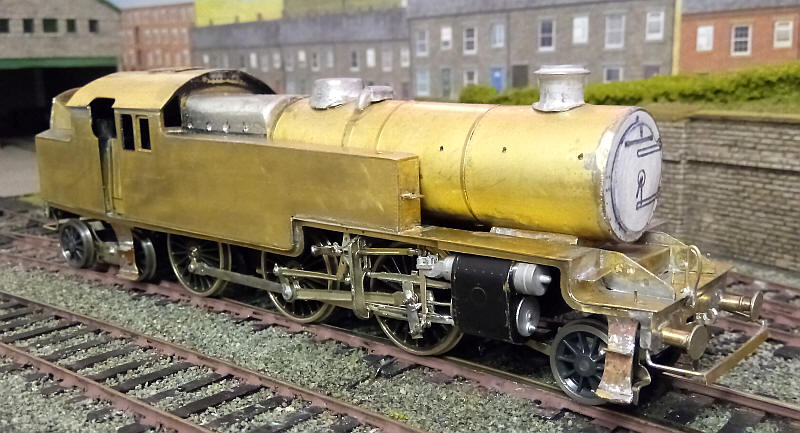
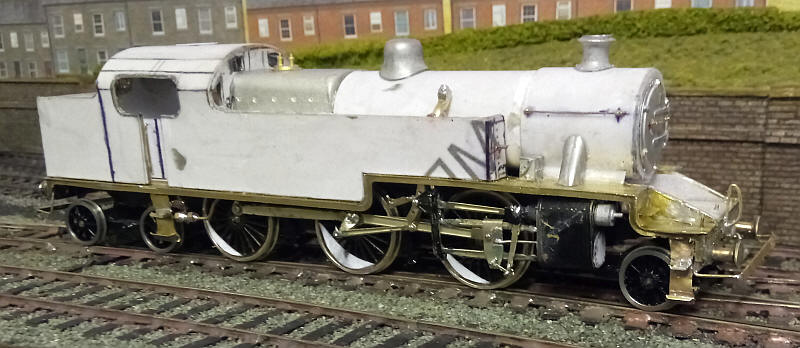
By far the most numerous class of 2-6-4Ts was the 2 cylinder Stanier version. Construction of the Alan Gibson kit is now underway. I'm not intending to give a blow by blow description of construction as I expect to largely follow the method described in the instructions.
The wheels are Markits 26mm 20 spoke wheels intended for 4mm scale LNER A1/3/4s. The bogie wheels are Gibson ones that came with the kit. Power will be a Mashima 1624 driving a Markits gearbox.
As can be seen in photo the footplate is complete and the basic chassis now rolls freely around the layout. The cylinder unit will need to be split as in my other LMS 2-8-0s and 4-6-0s to give sufficient clearance behind the slidebars and crossheads.
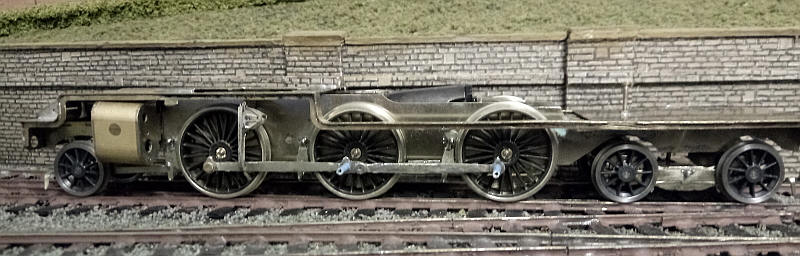
The cylinders and slide bar support brackets are now in place. As with the other LMS locos with valve gear I've had to move the cylinders and slide bar bracket about 1.5-2mm further out from their correct position in order to give sufficent clearance for the slidebars to clear the front crankpin. This has also meant some slight modifications to the slide bar support brackets to clear the footplate valences with a little metal needing to be removed.
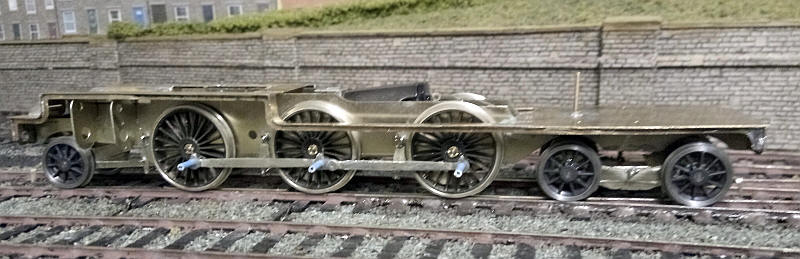
The chassis is now complete and for once it went together with few problems. To make it easier to fit the pick up wires I've bent the springs behind the wheels back at right angles to the frames as once in operation on the layout they're hardly visible. The rear bogie is held in place by a long bolt with a washer soldered to it; the slot in the top of the bogie frame has been elongated to allow sufficient sideways movememnt to negotiate the layout's tight curves. I've also wrapped a roll of lead around the axles to give more weight and better track holding.
As can be seen the motor sits between the frames; even without the weight of the loco body it will propel a six coach train without slipping.
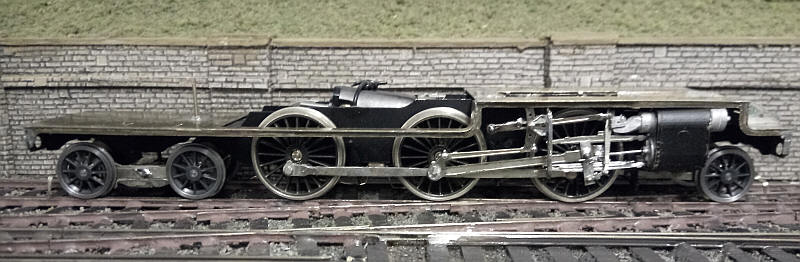
The basic loco body is in place. The etchings fitted well together, even the complex shaped coal bunker fitting with minimal filing.
The only major problem was that the rear motor drive shaft was rubbing on the cab floor which caused a screching sound when running forwards. Filing away a section of the brass solved that issue.
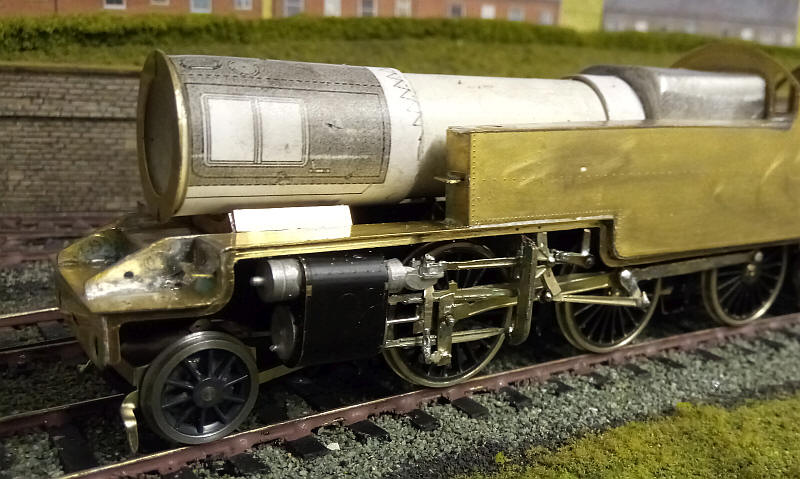
The next stage was to construct the firebox/ boiler and smokebox unit. For the firebox I've used a casting intended for a Jubilee which has been cut down (with considerbale difficulty as the metal was extremely hard). This sits snuggly on the shelf between the side tanks.
The boiler and smokebox will be built up around a piece of plastic central heating pipe in the same way as I did for the Class 5 and 8F. The tube was cut to the full length needed from the front of the firebox to the front of the smokebox. A coin was glued into one end of the tube with epoxy and this was then glued to the front ot the firebox - there is a semi circular location point on the firebox which amazingly exactly matches the outside diameter of the plastic tube!
The kit comes with an etched brass ring for the front of the boiler which I've already attached to the front of the tube with epoxy. There is also an etching for the smokebox wrapper which will be added later.
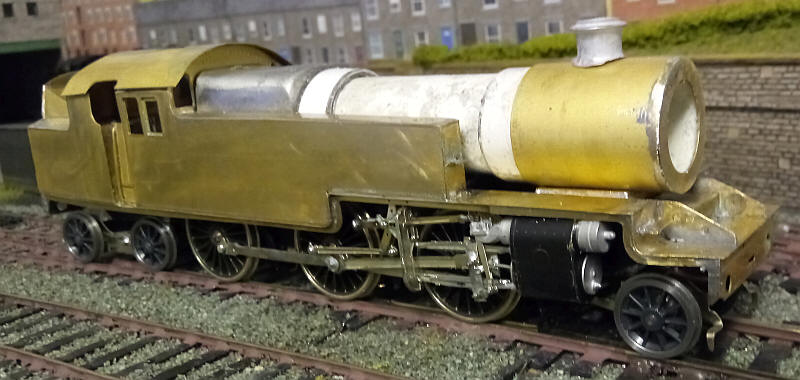
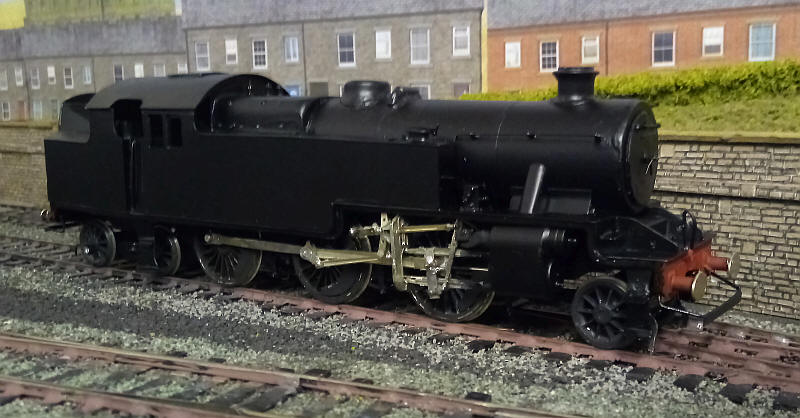
The smokebox wrapper has been glued to the ring of card with epoxy and also soldered at the front to the smokebox door ring and it is now sititng on the smokebox saddle at teh correct height. I've temporarily placed the cab roof and chimney and the loco is beginning to look like a Stanier 2-6-4T.
My original plan had been to use a cardboard wrapper for the central section of the boiler but included in the etches was a flat sheet of brass for the boiler. I decided to roll it to shape to see how well it fitted. To my amazement it was a perfect fit butting up gainst the firebox and the smokebox wrapper exactly. Since I hadn't done any precise measurements this was a real bonus!
I added some 4mm wide card strips along the top and underside of the boiler, as well as along the sides at 90 degrees to these. These will provide support to the thin brass boiler where the dome and top feed are and also for the handrails on the side of the boiler.
The underside of the boiler wrapper was coated in a thick layer of epoxy resin and held in place with elastic bands until the adhesive was set. The joint at the bottom of the boiler was soldered together.
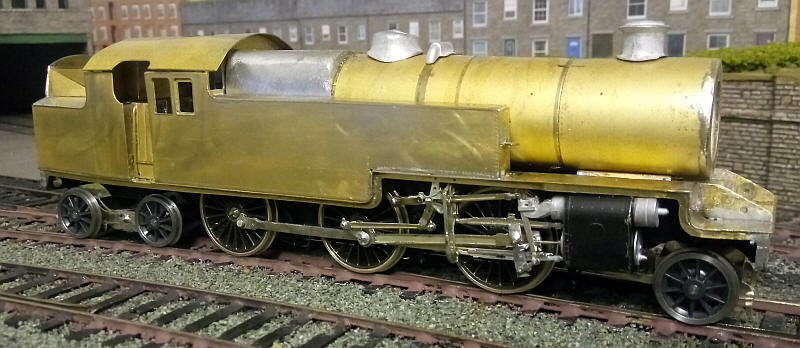
Before fitting the cab roof in place the inside of the cab was sprayed black and then the roof was solderd along the top edges of the cab sides. The stepas have been fitted, although the photo reveals that the front steps need adjusting. The various boiler castingsare in place but need some filler around the edges. The smokebox door is thin card glued to circular discs of reducing diameter giving a domed effect to the door itself. The rather obvious coupling bar is necessary to allow propelling of coaches on Pendle's sharp curves.
There are many small details to be added before painting.
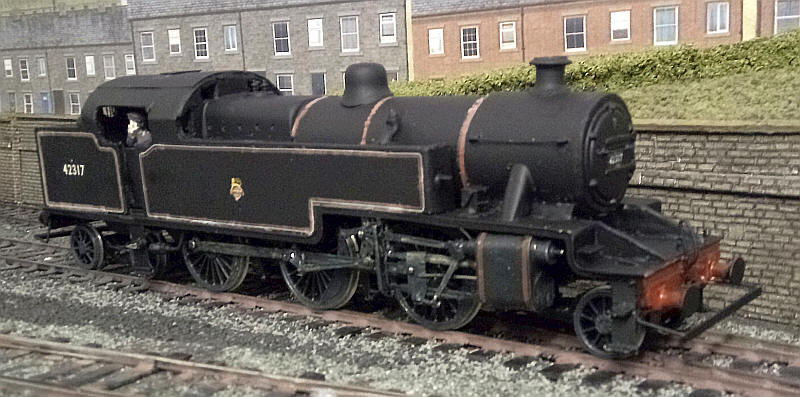
The completed model after the application of a coat of paint.
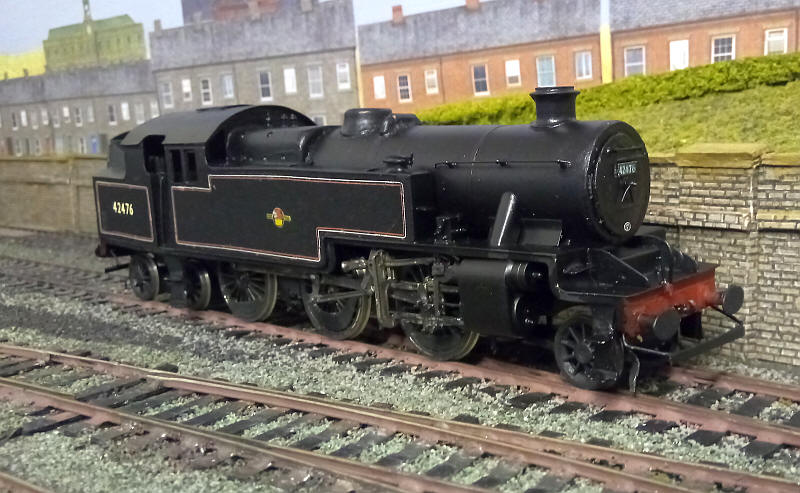
42476 was a Lostock Hall loco for much of the 1950s until its withdrawal in 1962.
The Fowler 2-6-4T
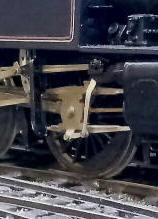
I've also built a Fowler 2-6-4T to complete the trio of LMS two-cylinder 2-6-4Ts . This uses the chassis and footplate from a spare Stanier 2-cylinder 2-6-4T etch but l needed a scratchbuilt body, which has been built largely out of cardboard.
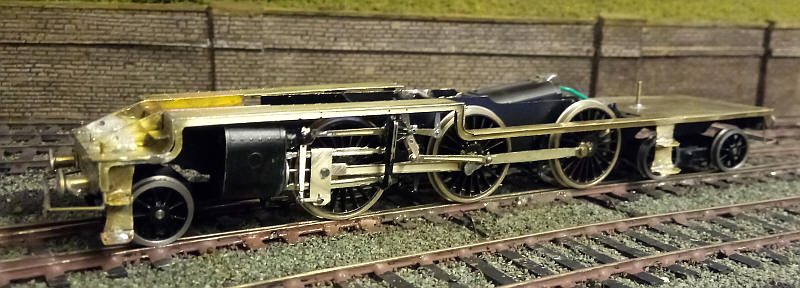
The chassis for the Fowler is now complete and has been built in much the same way as the Stanier version except for the method of constructing the crossheads.
Rather than fabricating them out of three small pieces of nickel silver sheet, which was extremely fiddly I've used the method I tried with my Deutsche Bundesbahn 2-6-2T. This German loco only has one slidebar and the crosshead was made from a strip of nickel silver folded at the top into a D shape which slides along the top slidebar. Using the same method for the British engine means that the crosshead doesn't actually use the lower slidebar. The piston rod is soldered onto the back of the strip whilst the connecting rod is pivoted from a pin passed through the strip.
Obviously, the crosshead is more clunky in appearance than the fabricated ones but isn't significantly worse than the Fairburn model built by Alan Gibson which has a equally large crosshead. Once the chassis is weathered I doubt it will be really noticeable.
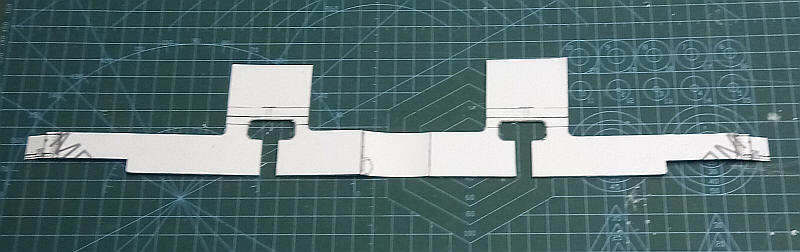
I found a good scale drawing of the Fowler 2-6-4T on the internet showing all the necessary elevations. Having printed the cab, side tanks and bunker onto thin card I joined them together with a piece for the rear bunker and then backed the majority of the thin card with a layer of mounting card. The cab roof extensions, the rear of the bunker and fronts of the side tanks were left as a single layer of card. The resulting net is shown below. It is very flimsy at the moment but will become rigid as construction progresses.
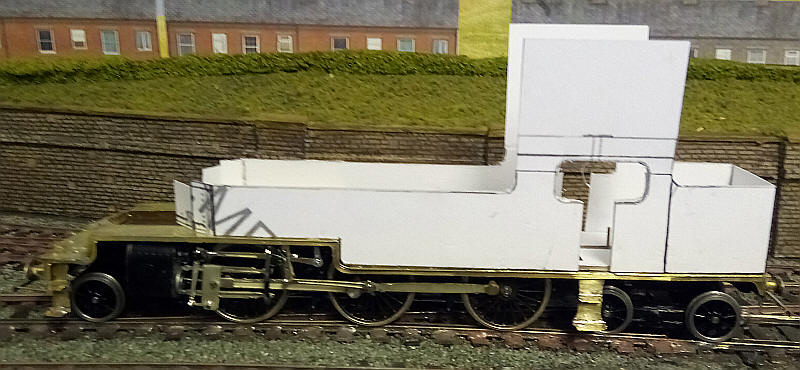
The tank sides, cab and bumker have now been secured to the brass footplate using strips of mounting board glued to the footplate as location points.
I've now added the cab front and rear and folded the roof to shape and secured it in place. The inside of the cab roof has been coated in a layer of epoxy resin to give it some rigidity. The cast metal firebox has been glued to the front of the cab and is also supported underneath by a strip of mounting board secured to the tank sides.
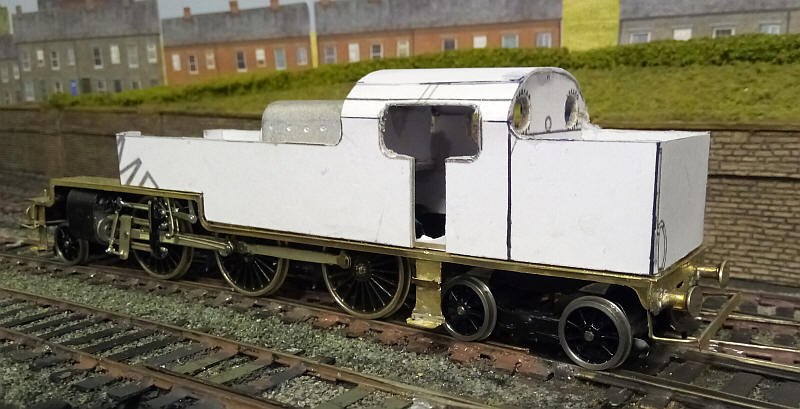
The rear of the cab has two circular windows which were cut out by making a series of cuts with a scalpel held vertically. A large circular file then tided up the edges of the card.
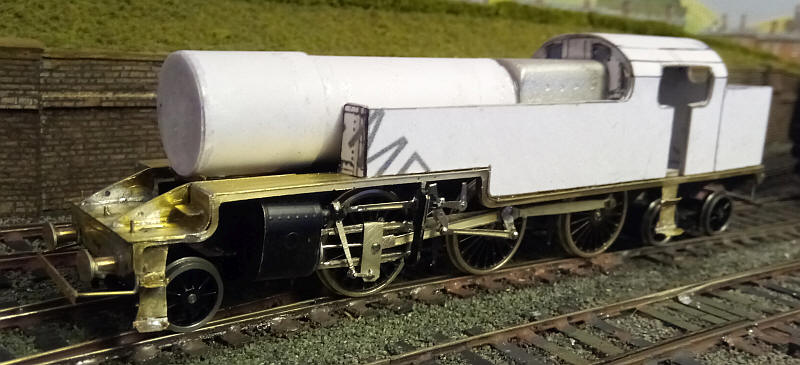
The boiler was made from a length of plastic central heating pipe. Several length of thin card was wrapped around the tube until the desired diameter was achieved. In order for the boiler to be secured to the curved extension at the front of the firebox this card wrapper was made about 2mm longer than the boiler tube.
Two layers of card were the wrapped around the front of the boiler tube for the smokebox which on the Fowler boilers is very obvious. The boiler is now secured in place with epoxy to the firebox and the base of the smokebox saddle.
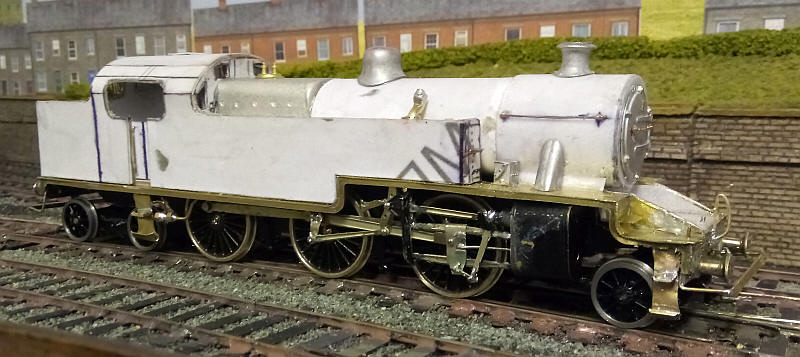
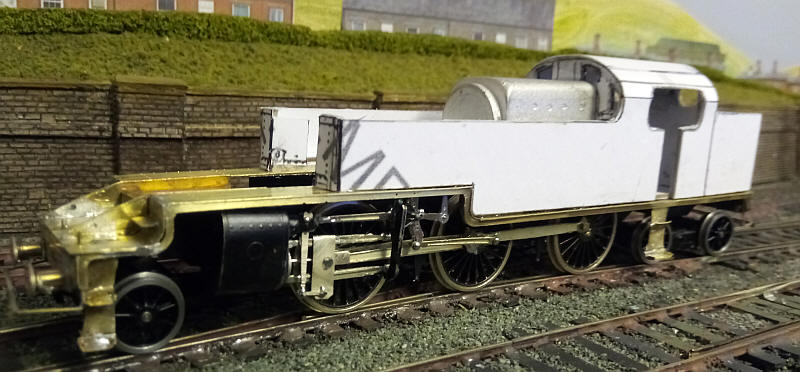
The loco superstructure is now complete. The various castings are by Alan Gibson. The cab roof and upper sides have been strengthened by coating inside with several layers of epoxy resin. As usual the card has been given a coat of wood hardener.
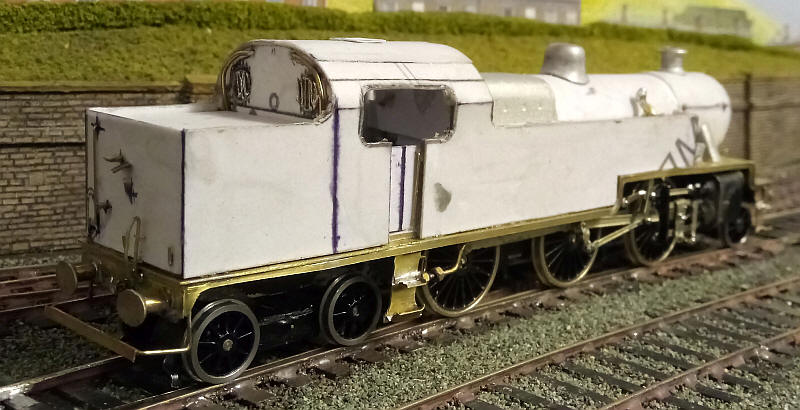
This rear view shows the rear spectacle plates with the wire protection for the glass. These were made by soldering four lengths of fine brass wire across the end of a brass tube. After trimming the wire to the correct length the tube was cut about 3mm from the end and pushed into the holes in teh cardboard. Various pieces of wire and metal strip have been used for the bunkre steps and the balancing pipes for the rear water tank at the back of the cab.

On the other side there are various pipes all made from wire and a few lost wax castings. The curious tank overflow outlet was fashioned from a length of thick brass wire and a shaped piece of solder for the domed top.
The final details have been added and the model now awaits painting.
The loco is now finished and ready for service.